Today I am going to be sharing about how to upload and delete files at AmazonS3 with SpringBoot, Amazon Simple Storage Service (S3) is an object storage platform which helps you to store the files in form of objects, it allows us to store and retrieve any amount of data from anywhere. Each file is stored in Amazon S3 (as an object) and is represented using a key.
we are going to be using AWS Java SDK which supports various APIs related to Amazon S3 service for working with files stored in S3 bucket.
so after going to https://start.spring.io/ and create a new SpringBoot project with the Artifact as AmazonS3 or as you prefer, open your pom.xml and let's add this dependency.
AWS Java SDK supports several APIs related to Amazon S3 service for working with files stored in S3 bucket.
<!-- https://mvnrepository.com/artifact/com.amazonaws/aws-java-sdk -->
<dependency>
<groupId>com.amazonaws</groupId>
<artifactId>aws-java-sdk</artifactId>
<version>1.11.598</version>
</dependency>
|
Amazon S3 Account Configuration
Please follow the instructions given in the Amazon S3 official documentation for creating and configuring the S3 account and bucket.
Click here to visit the official documentation.
https://docs.aws.amazon.com/AmazonS3/latest/gsg/GetStartedWithS3.html
Sign up with Amazon
First, you need to go to https://aws.amazon.com/s3/ for sign up with Amazon S3 service. You have to follow up the instructions given in the sign up document and need to complete the registration.
AWS will notify you by email when your account is active and available for you to use. Once your account is active and ready to use
Creating S3 bucket
login to https://console.aws.amazon.com/s3 and click on “Create bucket” from below screen.

don't forget letting Block all public access OFF

Then it will list down the newly created bucket as follows.

Now let's Create an IAM User
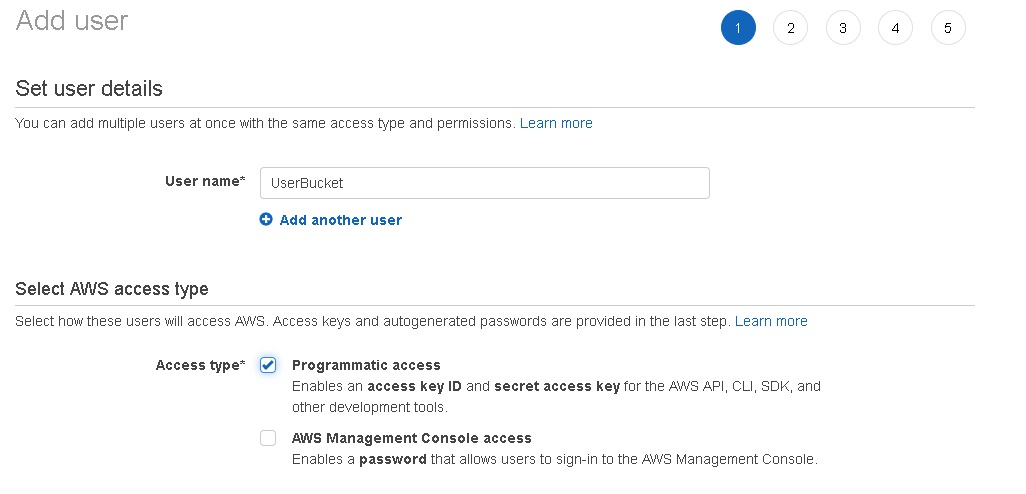
Go to https://console.aws.amazon.com/iam/ . In the navigation pane, choose Users and then choose Add user.
Input User name, choose Programmatic access for Access type:
Press Next: Permissions button -> go to Set permissions for UserBucket
Now, choose Attach existing policies directly -> filter policy type s3, then check AmazonS3FullAccess. Then click on “Next Review“.


Once you have reviewed the details, press “Create user“. Now you have successfully created the user.

Click on Download .csv for downloading the credentials. and what we are going to be needing from this file are the Access key ID and the Secret access key
let's open the SpringBoot Amazon S3 project application which we downloaded previously from https://start.spring.io/
Final Project Structure
Your final project structure should looks like below.

Application.properties
Add the AWS S3 bucket related configurations in the application.properties as follows. You will find those configurations details in the CSV file (Download.csv) that you have already downloaded. Change the properties
there are Max file size. and Max Request Size, you can change those setting if you want to upload big files, and do not forget your region, My region in my case is N. Virginia us-east-1
spring.servlet.multipart.enabled=true
# Threshold after which files are written to disk.
spring.servlet.multipart.file-size-threshold=2KB
# Max file size.
spring.servlet.multipart.max-file-size=200MB
# Max Request Size
spring.servlet.multipart.max-request-size=215MB
aws.access.key.id = your_secret_id
aws.access.key.secret = your_secret_key
aws.region = us-east-1
aws.s3.audio.bucket = buckettesters
|
Let's get started creating the AmazonS3Config.java inside the folder Model
package com.example.AmazonS3.Model;
import org.springframework.beans.factory.annotation.Value;
import org.springframework.context.annotation.Bean;
import org.springframework.context.annotation.Configuration;
import com.amazonaws.auth.AWSCredentialsProvider;
import com.amazonaws.auth.AWSStaticCredentialsProvider;
import com.amazonaws.auth.BasicAWSCredentials;
import com.amazonaws.regions.Region;
import com.amazonaws.regions.Regions;
@Configuration
public class AmazonS3Config
{
@Value("${aws.access.key.id}")
private String awsKeyId;
@Value("${aws.access.key.secret}")
private String awsKeySecret;
@Value("${aws.region}")
private String awsRegion;
@Value("${aws.s3.audio.bucket}")
private String awsS3AudioBucket;
@Bean(name = "awsKeyId")
public String getAWSKeyId() {
return awsKeyId;
}
@Bean(name = "awsKeySecret")
public String getAWSKeySecret() {
return awsKeySecret;
}
@Bean(name = "awsRegion")
public Region getAWSPollyRegion() {
return Region.getRegion(Regions.fromName(awsRegion));
}
@Bean(name = "awsCredentialsProvider")
public AWSCredentialsProvider getAWSCredentials() {
BasicAWSCredentials awsCredentials = new BasicAWSCredentials(this.awsKeyId, this.awsKeySecret);
return new AWSStaticCredentialsProvider(awsCredentials);
}
@Bean(name = "awsS3AudioBucket")
public String getAWSS3AudioBucket() {
return awsS3AudioBucket;
}
}
|
AmazonS3 is a class from amazon dependency. All other fields are just a representation of variables from our application.properties file.
The @Value annotation will bind application properties directly to class fields during application initialization.
Let's create AmazonS3ClientService.java in the Service folder
package com.example.AmazonS3.Service;
import org.springframework.web.multipart.MultipartFile;
public interface AmazonS3ClientService
{
void uploadFileToS3Bucket(MultipartFile multipartFile, boolean enablePublicReadAccess);
void deleteFileFromS3Bucket(String fileName);
}
|
AmazonS3ClientServiceImpl.java
package com.example.AmazonS3.Service;
import com.amazonaws.services.s3.model.CannedAccessControlList;
import com.amazonaws.services.s3.model.DeleteObjectRequest;
import com.amazonaws.services.s3.model.PutObjectRequest;
import org.slf4j.Logger;
import org.slf4j.LoggerFactory;
import org.springframework.beans.factory.annotation.Autowired;
import org.springframework.scheduling.annotation.Async;
import org.springframework.stereotype.Component;
import com.amazonaws.AmazonServiceException;
import com.amazonaws.auth.AWSCredentialsProvider;
import com.amazonaws.regions.Region;
import com.amazonaws.services.s3.AmazonS3;
import com.amazonaws.services.s3.AmazonS3ClientBuilder;
import org.springframework.web.multipart.MultipartFile;
import java.io.File;
import java.io.FileOutputStream;
import java.io.IOException;
@Component
public class AmazonS3ClientServiceImpl implements AmazonS3ClientService
{
private String awsS3AudioBucket;
private AmazonS3 amazonS3;
private static final Logger logger = LoggerFactory.getLogger(AmazonS3ClientServiceImpl.class);
@Autowired
public AmazonS3ClientServiceImpl(Region awsRegion, AWSCredentialsProvider awsCredentialsProvider, String awsS3AudioBucket)
{
this.amazonS3 = AmazonS3ClientBuilder.standard()
.withCredentials(awsCredentialsProvider)
.withRegion(awsRegion.getName()).build();
this.awsS3AudioBucket = awsS3AudioBucket;
}
@Async
public void uploadFileToS3Bucket(MultipartFile multipartFile, boolean enablePublicReadAccess)
{
String fileName = multipartFile.getOriginalFilename();
try {
//creating the file in the server (temporarily)
File file = new File(fileName);
FileOutputStream fos = new FileOutputStream(file);
fos.write(multipartFile.getBytes());
fos.close();
PutObjectRequest putObjectRequest = new PutObjectRequest(this.awsS3AudioBucket, fileName, file);
if (enablePublicReadAccess) {
putObjectRequest.withCannedAcl(CannedAccessControlList.PublicRead);
}
this.amazonS3.putObject(putObjectRequest);
//removing the file created in the server
file.delete();
} catch (IOException | AmazonServiceException ex) {
logger.error("error [" + ex.getMessage() + "] occurred while uploading [" + fileName + "] ");
}
}
@Async
public void deleteFileFromS3Bucket(String fileName)
{
try {
amazonS3.deleteObject(new DeleteObjectRequest(awsS3AudioBucket, fileName));
} catch (AmazonServiceException ex) {
logger.error("error [" + ex.getMessage() + "] occurred while removing [" + fileName + "] ");
}
}
}
|
The two methods responsible for uploading and deleting files are annotated with @Async to make them asynchronous. That means those methods will be executed in some other background thread except the main thread (the thread responsible for serving the request)
When uploading files, the below code segment is responsible for adding PublicRead permissions to the file being uploaded. It means that anyone who has the file url can access the file.
putObjectRequest.withCannedAcl(CannedAccessControlList.PublicRead);
FileHandlerController.java
package com.example.AmazonS3.Service;
import com.amazonaws.services.s3.model.CannedAccessControlList;
import com.amazonaws.services.s3.model.DeleteObjectRequest;
import com.amazonaws.services.s3.model.PutObjectRequest;
import org.slf4j.Logger;
import org.slf4j.LoggerFactory;
import org.springframework.beans.factory.annotation.Autowired;
package com.example.AmazonS3.Controller;
import org.springframework.beans.factory.annotation.Autowired;
import org.springframework.web.bind.annotation.*;
import org.springframework.web.multipart.MultipartFile;
import java.io.IOException;
import java.util.Arrays;
import java.util.List;
import java.util.stream.Collectors;
import java.util.HashMap;
import java.util.Map;
import com.example.AmazonS3.Service.AmazonS3ClientService;
@RestController
@RequestMapping("/s3bucket")
public class FileHandlerController {
@Autowired
private AmazonS3ClientService amazonS3ClientService;
@PostMapping("uploadone")
public Map<String, String> uploadSingleFile(@RequestPart(value = "file") MultipartFile file)
{
System.out.println("get data..");
this.amazonS3ClientService.uploadFileToS3Bucket(file, true);
Map<String, String> response = new HashMap<>();
response.put("message", "file [" + file.getOriginalFilename() + "] uploading request submitted successfully.");
return response;
}
@PostMapping("uploadmultiple")
public String uploadMultipleFiles(@RequestParam("files") MultipartFile[] files)throws IOException
{
for(MultipartFile uploadedFile : files) {
System.out.println(uploadedFile.getOriginalFilename());
uploadSingleFile(uploadedFile);
}
return "OK";
}
@DeleteMapping
public Map<String, String> deleteFile(@RequestParam("file_name") String fileName)
{
this.amazonS3ClientService.deleteFileFromS3Bucket(fileName);
Map<String, String> response = new HashMap<>();
response.put("message", "file [" + fileName + "] removing request submitted successfully.");
return response;
}
@DeleteMapping("delete")
public String deleteFiles(@RequestBody Map<String, Object> userMap)
{
String metaInfoId = (String) userMap.get("metaInfoId");
deleteFile(metaInfoId);
return "OK -->"+metaInfoId;
}
}
|
Let's test it with POSTMAN uploading just one file


you can download the poject in GitHub from here https://github.com/juandavidmarin368/SpringBoot-AmazonS3-AWS
This article is a creative one and the concept is good to enhance our knowledge. Waiting for more updates.
ReplyDeleteAWS Online Training
Nice blog, very informative content.Thanks for sharing, waiting for the next update…
ReplyDeleteJava Tutorial for Beginners
Java Programming Tutorial
Nice blog, very informative content.Thanks for sharing, waiting for the next update…
ReplyDeletestatistics for data science tutorial
Data Science Tutorial for Beginners
ReplyDeleteYou need to participate in a challenge for probably the best webpage on the web. I will enthusiastically suggest this site!
best interiors
Great post. keep sharing such a worthy information
ReplyDeleteRPA Training in Chennai
RPA Training Online
RPA Training In Bangalore
ReplyDeleteThis post is so interactive and informative.keep update more information...
Tally Course in Tambaram
Tally course in Chennai
This post is so interactive and informative.keep update more information...
ReplyDeleteWeb Designing course in Velachery
Web Designing Course in chennai