when we are going to take our applications to production mode, we must have an SSL certificate for the FrontEnd and BackEnd too, in this case, our backend is a SpringBoot which is using a tomcat embedded server.
I got a domain name for securing the API apitester.xyz for this purpose and a PositiveSSL from Namecheap https://www.namecheap.com/security/ssl-certificates/comodo/positivessl/
the first thing we need to do is generating a CSR using the keytool provided by JDK
replace apitester.xyz by your domain name
so under the chose folder, let's run
keytool -genkey -keysize 2048 -keyalg RSA -alias apitester.xyz -keystore apitester.jks
at alias, I set apitester.xyz so that it was the domain name that I chose for securing the API for this example
You will be prompted to enter a password. Default password for apitester.xyz is 123456 change that password by yours
after running that command you are going to be asked some details on the prompt:
we must pay attention to this, the first question What is your first and last name, that's where you set the domain name you want to secure for your API, in my case apitester.xyz do not forget the password you typed for this example I wrote the password 123456
Enter keystore password:
Re-enter new password:
What is your first and last name?
[Unknown]: apitester.xyz
What is the name of your organizational unit?
[Unknown]: Deployments
What is the name of your organization?
[Unknown]: JuanDavid
What is the name of your City or Locality?
[Unknown]: Manizales
What is the name of your State or Province?
[Unknown]: Caldas
What is the two-letter country code for this unit?
[Unknown]: CO
Is CN=apitester.xyz, OU=Deployments, O=JuanDavid, L=Manizales, ST=Caldas, C=CO correct?
[no]: yes
Enter key password for <apitester.xyz>
(RETURN if same as keystore password):
Re-enter new password:

a .jks was generated.
we need to generate the CSR running the command below using the Keystore with the Private Key we established in the step above:
keytool -certreq -alias apitester.xyz -file apitester.csr -keystore apitester.jks
after this, you are going to be asked for the password you enter at the beginning 123456
now you have got a file called apitester.csr
The CSR generated is in the file .csr Now you just need to open it as plain text. This plain text will be what you submit on the provider for the activation of the certificate.
now run this command:
cat apitester.csr
-----BEGIN NEW CERTIFICATE REQUEST-----
MIIC6TCCAdECAQAwdDELMAkGA1UEBhMCQ08xDzANBgNVBAgTBkNhbGRhczESMBAG
A1UEBxMJTWFuaXphbGVzMRIwEAYDVQQKEwlKdWFuRGF2aWQxFDASBgNVBAsTC0Rl
cGxveW1lbnRzMRYwFAYDVQQDEw1hcGl0ZXN0ZXIueHl6MIIBIjANBgkqhkiG9w0B
AQEFAAOCAQ8AMIIBCgKCAQEAkgL4FN74FYKSzHwNd33xClYDOAvI12yQ+YNMu0oI
IB7TGIgo+iR0V3ifX8azG+niRDUpVQ3JqXmtr9ABdGvaax9e7huCP2H4GVQQLo58
/hdk17xlIxtFCnnWeaVWI9p9MKh1yN5aTPdr0EW7W3ou53aHkSlK+vl+gLVsD2HN
TIxTSyjCznveS91G/N7snYfsiI5U/s/wYHqT5AhmjrYpcPzMQDM/ZFqtJQpHSyVc
-----END NEW CERTIFICATE REQUEST-----
let's copy what you get and paste it on

now click on next and select the option Windows IIS or Java Tomcat, chose on DCV method DNS-based I am using this method so that I do not have any email server like Zimbra or any other up and running on the server, so these steps are done to verify you are the owner of the domain name, that will be asking you for an email in which you are going to be notified as soon as the certification is ready
after that, you get something like this

you must click on


now you must go to the Advanced DNS of your domain and create a new CNAME Record and copy and paste the values Host and Target from the last step, it should look something like this

in a few minutes you should have a notification allowing you to download your certificate, so download the certificate and upload it to your server to the folder SSL, or the name you have given to it and unzip the file.
on this zip file we have:
apitester_xyz.p7b
apitester_xyz.ca-bundle
apitester_xyz.crt
the .p7b extension includes the certificate issued for your domain with the CA certificates, the one we need to import in the keystore with this command:
keytool -import -trustcacerts -alias apitester.xyz -file apitester_xyz.p7b -keystore apitester.jks
it'll ask for a password and you type the password with the one we started 123456
and if everything was right you should get something like this:
Certificate reply was installed in keystore
To check the certificates which were added in the keystore run the command below:
keytool -list -keystore apitester.jks -v
You should see the details of the certificates imported into the keystore in the output:

if you get an error like this " Otherwise, an Input not an X.509 certificate error may occur. ", it is because you are setting bad the alias or the .p7b or the Keystore .jks
now, we just jump to the last step, we need to convert our JKS into .p12 or PKCS #12 and importing it between our Java servers, in our case SpringBoot using Tomcat embedded.
We are going to use a Keytool (converting complete Keystore with end-entity certificate and full chain into PKCS #12)
we do it running the next command:
keytool -importkeystore -srckeystore apitester.jks -srcstorepass 123456 -srcstoretype jks -destkeystore apitester.p12 -deststoretype pkcs12 -deststorepass 123456
if everything was right a new file PKCS #12 or .p12 apitester.p12 was generated, you should now see something like this

so now it is time to test it using SpringBoot with Tomcat embedded
let's go to https://start.spring.io/ on Artifact I set GenericTomcat, chose as you want

let's open the project with any editor, and inside src/main/java/com/example/GenericTomcat/ let's create a class called NewController.java
it looks something like this

let's open the file application.properties inside resources and let's paste this code
you can choose any server port number just be aware to let it open on your firewall, now let's run
at the root project folder mvn clean compile package, let's take out final .jar GenericTomcat-0.0.1-SNAPSHOT.jar and let's upload it to the remote server, let's copy from the resources the application.properties and paste it close to the final .jar and let's copy the apiester.p12 which was generated before at the folder you are going to run the final .jar
NOTE: these same settings work perfectly for using Undertow instead of Tomcat embedded

let's now run it with java -jar GenericTomcat-0.0.1-SNAPSHOT.jar

as you can see it says: Tomcat started on port(s): 8443 (https)
NOTE: if you want to run SpringBoot with Undertow as the default server you've got to add this maven dependency
and now you must do an exclusion of the default Tomcat like this
now if you run your SpringBoot application, it will do it but with Undertow as the default server instead of Tomcat, and the whole SSL settings in application.properties are crystal clear, the same thing regardless if the default server is Tomcat or Undertow
NOTE: " It is a good idea to have the application.properties close to the final .jar because if you need to change the server port or you generated another .p12 or any other setting, you are not going to recompile everything again, you just change the values you need on that file.
if you want to have that .p12 file hardcoded then you need to set this command line in the application.properties
server.ssl.key-store=classpath:apitester.p12
it is because you are going to have the .p12 file inside the resources folder and compile it and let it inside the same .jar
Do not try to run the application in a localhost environment because it just won't work unless you've got an SSL running locally, or unless you are compiling the code at the server the application is going to be running, what I just did was compiling the code on the terminal I worked with and after that, I just uploaded the final .jar to the remote server
"
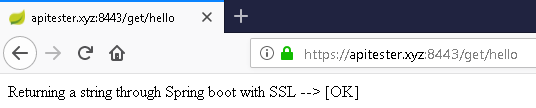
now that the SpringBoot application is up and running the best way to test what we have done until now is testing the endpoint on a browser https://apitester.xyz:8443/get/hello

we can see now that our API is running with SSL!, another way to test it is
going to this address https://decoder.link/sslchecker let's set our domain name and port 8443
if everything was done perfect, you should get something like this

you can download the project for Tomcat from this link in GitHub https://github.com/juandavidmarin368/SpringBoot-with-Tomcat-HTTPS
NOTE: "
* If you are going to move your API to another server, you just copy the .p12 file and change your CNAME to the new server and it works as before.
* You can have multiple SpringBoot applications .jar at the same time using the same .p12 but having them on different ports on the same server, an example about it would be:
SpringBoot app one = https://apitester.xyz:8443/get/hello
SpringBoot app two = https://apitester.xyz:8454/users
"
Terminology
TLS vs SSL
TLS is the successor to SSL. It is a protocol that ensures privacy between communicating applications. Unless otherwise stated, in this document consider TLS and SSL as interchangable.
Certificate (cert)The public half of a public/private key pair with some additional metadata about who issued it etc. It may be freely given to anyone.
Private Key
A private key can verify that its corresponding certificate/public key was used to encrypt data. It is never given out publicly.
Certificate Authority (CA)
A company that issues digital certificates. For SSL/TLS certificates, there are a small number of providers (e.g. Symantec/Versign/Thawte, Comodo, GoDaddy, LetsEncrypt) whose certificates are included by most browsers and Operating Systems. They serve the purpose of a “trusted third party”.
Certificate Signing Request (CSR)
A file generated with a private key. A CSR can be sent to a CA to request to be signed. The CA uses its private key to digitally sign the CSR and create a signed cert. Browsers can then use the CA’s cert to validate the new cert has been approved by the CA.
X.509
A specification governing the format and usage of certificates.
Authentication with SSL
SSL is the standard security technology for establishing an encrypted link between a web server and a browser. Normally when a browser (the client) establishes an SSL connection to a secure web site, only the server certificate is checked. The browser either relies on itself or the operating system providing a list of certs that have been designated as root certificates and to be trusted as CAs.
One-way SSL authentication (server -> client)
Client and server use 9 handshake messages to establish the encrypted channel prior to message exchanging:
- Client sends ClientHello message proposing SSL options.
- Server responds with ServerHello message selecting the SSL options.
- Server sends Certificate message, which contains the server’s certificate.
- Server concludes its part of the negotiation with ServerHelloDone message.
- Client sends session key information (encrypted with server’s public key) in ClientKeyExchange message.
- Client sends ChangeCipherSpec message to activate the negotiated options for all future messages it will send.
- Client sends Finished message to let the server check the newly activated options.
- Server sends ChangeCipherSpec message to activate the negotiated options for all future messages it will send.
- Server sends Finished message to let the client check the newly activated options.
Two-way SSL authentication (server <-> client)
Client and server use 12 handshake messages to establish the encrypted channel prior to message exchanging:
- Client sends ClientHello message proposing SSL options.
- Server responds with ServerHello message selecting the SSL options.
- Server sends Certificate message, which contains the server’s certificate.
- Server requests client’s certificate in CertificateRequest message, so that the connection can be mutually authenticated.
- Server concludes its part of the negotiation with ServerHelloDone message.
- Client responds with Certificate message, which contains the client’s certificate.
- Client sends session key information (encrypted with server’s public key) in ClientKeyExchange message.
- Client sends a CertificateVerify message to let the server know it owns the sent certificate.
- Client sends ChangeCipherSpec message to activate the negotiated options for all future messages it will send.
- Client sends Finished message to let the server check the newly activated options.
- Server sends ChangeCipherSpec message to activate the negotiated options for all future messages it will send.
- Server sends Finished message to let the client check the newly activated options.
File Formats for Certs and Keys
Privacy-Enhanced Mail (PEM)
PEM is just Distinguished Encoding Rules (DER) that has been Base64 encoded. Used for keys and certificates.
PKCS12
PKCS12 is a password-protected format that can contain multiple certificates and keys.
Java KeyStore (JKS)
Java version of PKCS12 and also password protected. Entries in a JKS file must have an “alias” that is unique. If an alias is not specified, “mykey” is used by default. It’s like a database for certs and keys.
Tools
OpenSSL
An open source toolkit implementing the SSL (v2/v3) and TLS (v1) protocols, as well as a full-strength general purpose cryptography library.
Keytool
Manages a Java KeyStore of cryptographic keys, X.509 certificate chains, and trusted certificates. Ships with the JDK.
XCA
A graphical tool to create and manage certificates.
PKI and the SSL Certificate Chain (“the Chain of Trust”)
All SSL/TLS connections rely on a chain of trust called the SSL Certificate Chain. Part of PKI (Public Key Infrastructure), this chain of trust is established by certificate authorities (CAs) who serve as trust anchors that verify the validity of the systems being communicated with. Each client (browser, OS, etc.) ships with a list of trusted CAs.
CA-signed Certificates

In the above example, the wildcard certificate for “*.elastic.snaplogic.com” has been issued by the “Go Daddy Secure Certificate Authority - G2” intermediate CA, which in turn was issued by the “Go Daddy Root Certificate Authority - G2” root CA.
Many organizations will create their own internal, self-signed root CA to be used to sign certificates for PKI use within that organization. Then, if each system trusts that CA, the certificates that are issued and signed by that CA will be trusted too.
To trust a system that presents a the above certificate at a particular domain (e.g. https://elastic.snaplogic.com), the client system must trust both the intermediate CA and the root CA (the public certs of those CAs must exist in the client system’s trust/CA store), as well as verifying the chain is valid (signatures match, domain names match, and other requirements of the X.509 standard).
Once a client trusts the intermediate and root CAs, all valid certificates signed by those CAs will be trusted by the client.
this process is for the ones who have got a server and a domain name up and running for the API pointing to their servers, for the purpose I got a domain name and SSL certificate with Namecheap, the process is the same one for any other provider, so I did the process under the /root folder creating a new folder SSL where we are going to be working with.I got a domain name for securing the API apitester.xyz for this purpose and a PositiveSSL from Namecheap https://www.namecheap.com/security/ssl-certificates/comodo/positivessl/
the first thing we need to do is generating a CSR using the keytool provided by JDK
replace apitester.xyz by your domain name
so under the chose folder, let's run
keytool -genkey -keysize 2048 -keyalg RSA -alias apitester.xyz -keystore apitester.jks
at alias, I set apitester.xyz so that it was the domain name that I chose for securing the API for this example
You will be prompted to enter a password. Default password for apitester.xyz is 123456 change that password by yours
after running that command you are going to be asked some details on the prompt:
we must pay attention to this, the first question What is your first and last name, that's where you set the domain name you want to secure for your API, in my case apitester.xyz do not forget the password you typed for this example I wrote the password 123456
Enter keystore password:
Re-enter new password:
What is your first and last name?
[Unknown]: apitester.xyz
What is the name of your organizational unit?
[Unknown]: Deployments
What is the name of your organization?
[Unknown]: JuanDavid
What is the name of your City or Locality?
[Unknown]: Manizales
What is the name of your State or Province?
[Unknown]: Caldas
What is the two-letter country code for this unit?
[Unknown]: CO
Is CN=apitester.xyz, OU=Deployments, O=JuanDavid, L=Manizales, ST=Caldas, C=CO correct?
[no]: yes
Enter key password for <apitester.xyz>
(RETURN if same as keystore password):
Re-enter new password:
a .jks was generated.
we need to generate the CSR running the command below using the Keystore with the Private Key we established in the step above:
keytool -certreq -alias apitester.xyz -file apitester.csr -keystore apitester.jks
after this, you are going to be asked for the password you enter at the beginning 123456
now you have got a file called apitester.csr
The CSR generated is in the file .csr Now you just need to open it as plain text. This plain text will be what you submit on the provider for the activation of the certificate.
now run this command:
cat apitester.csr
-----BEGIN NEW CERTIFICATE REQUEST-----
MIIC6TCCAdECAQAwdDELMAkGA1UEBhMCQ08xDzANBgNVBAgTBkNhbGRhczESMBAG
A1UEBxMJTWFuaXphbGVzMRIwEAYDVQQKEwlKdWFuRGF2aWQxFDASBgNVBAsTC0Rl
cGxveW1lbnRzMRYwFAYDVQQDEw1hcGl0ZXN0ZXIueHl6MIIBIjANBgkqhkiG9w0B
AQEFAAOCAQ8AMIIBCgKCAQEAkgL4FN74FYKSzHwNd33xClYDOAvI12yQ+YNMu0oI
IB7TGIgo+iR0V3ifX8azG+niRDUpVQ3JqXmtr9ABdGvaax9e7huCP2H4GVQQLo58
/hdk17xlIxtFCnnWeaVWI9p9MKh1yN5aTPdr0EW7W3ou53aHkSlK+vl+gLVsD2HN
TIxTSyjCznveS91G/N7snYfsiI5U/s/wYHqT5AhmjrYpcPzMQDM/ZFqtJQpHSyVc
-----END NEW CERTIFICATE REQUEST-----
let's copy what you get and paste it on
after that, you get something like this
you must click on
- If you’re using DNS-based DCV method, go to Certificate Details page to get the necessary host records.
so this was the method we chose, after clicking on this link you'll see something like this
Click on get Record and you will get something like this
now you must go to the Advanced DNS of your domain and create a new CNAME Record and copy and paste the values Host and Target from the last step, it should look something like this
on this zip file we have:
apitester_xyz.p7b
apitester_xyz.ca-bundle
apitester_xyz.crt
the .p7b extension includes the certificate issued for your domain with the CA certificates, the one we need to import in the keystore with this command:
keytool -import -trustcacerts -alias apitester.xyz -file apitester_xyz.p7b -keystore apitester.jks
it'll ask for a password and you type the password with the one we started 123456
and if everything was right you should get something like this:
Certificate reply was installed in keystore
To check the certificates which were added in the keystore run the command below:
keytool -list -keystore apitester.jks -v
You should see the details of the certificates imported into the keystore in the output:
if you get an error like this " Otherwise, an Input not an X.509 certificate error may occur. ", it is because you are setting bad the alias or the .p7b or the Keystore .jks
now, we just jump to the last step, we need to convert our JKS into .p12 or PKCS #12 and importing it between our Java servers, in our case SpringBoot using Tomcat embedded.
We are going to use a Keytool (converting complete Keystore with end-entity certificate and full chain into PKCS #12)
Before proceeding with these steps, the end-entity certificate must be correctly imported into Keystore. This is essentially an inverted process of the one described above – meaning the source keystore type (srcstoretype) will be jks, and the destination type will be the new file PKCS #12. or .p12
Note: Some Java versions running Tomcat (or other servlet container using keytool as private/public keys management shell) have different preferred file extensions with which PKCS #12 is generated. Older versions (JDK 1.6 and earlier) can generate .p12 files. The latest versions can generate .pfx files. In terms of the file content, .p12 and .pfx files are essentially the same. However, .p12 can easily be renamed as .pfx in Shell
we do it running the next command:
keytool -importkeystore -srckeystore apitester.jks -srcstorepass 123456 -srcstoretype jks -destkeystore apitester.p12 -deststoretype pkcs12 -deststorepass 123456
if everything was right a new file PKCS #12 or .p12 apitester.p12 was generated, you should now see something like this
so now it is time to test it using SpringBoot with Tomcat embedded
let's go to https://start.spring.io/ on Artifact I set GenericTomcat, chose as you want
let's open the project with any editor, and inside src/main/java/com/example/GenericTomcat/ let's create a class called NewController.java
package com.example.GenericTomcat;
import org.springframework.web.bind.annotation.RequestMapping; import org.springframework.web.bind.annotation.GetMapping; import org.springframework.stereotype.Controller; import org.springframework.http.HttpStatus; import org.springframework.http.ResponseEntity; @Controller @RequestMapping("get") public class NewController{ @GetMapping("hello") public ResponseEntity<String> getTotalhoy(){ return new ResponseEntity<String>("Returning a string through Spring boot with SSL --> [OK]", HttpStatus.OK); } } |
it looks something like this
let's open the file application.properties inside resources and let's paste this code
server.port=8443
server.ssl.enabled=true security.require-ssl=true server.ssl.key-store=apitester.p12 server.ssl.key-store-password=123456 server.ssl.key-alias=apitester.xyz server.ssl.key-password=123456 |
you can choose any server port number just be aware to let it open on your firewall, now let's run
at the root project folder mvn clean compile package, let's take out final .jar GenericTomcat-0.0.1-SNAPSHOT.jar and let's upload it to the remote server, let's copy from the resources the application.properties and paste it close to the final .jar and let's copy the apiester.p12 which was generated before at the folder you are going to run the final .jar
NOTE: these same settings work perfectly for using Undertow instead of Tomcat embedded
let's now run it with java -jar GenericTomcat-0.0.1-SNAPSHOT.jar
as you can see it says: Tomcat started on port(s): 8443 (https)
NOTE: if you want to run SpringBoot with Undertow as the default server you've got to add this maven dependency
<dependency>
<groupId>org.springframework.boot</groupId>
<artifactId>spring-boot-starter-undertow</artifactId>
</dependency>
and now you must do an exclusion of the default Tomcat like this
<dependency>
<groupId>org.springframework.boot</groupId>
<artifactId>spring-boot-starter-web</artifactId>
<exclusions>
<exclusion>
<groupId>org.springframework.boot</groupId>
<artifactId>spring-boot-starter-tomcat</artifactId>
</exclusion>
</exclusions>
</dependency>
now if you run your SpringBoot application, it will do it but with Undertow as the default server instead of Tomcat, and the whole SSL settings in application.properties are crystal clear, the same thing regardless if the default server is Tomcat or Undertow
NOTE: " It is a good idea to have the application.properties close to the final .jar because if you need to change the server port or you generated another .p12 or any other setting, you are not going to recompile everything again, you just change the values you need on that file.
if you want to have that .p12 file hardcoded then you need to set this command line in the application.properties
server.ssl.key-store=classpath:apitester.p12
it is because you are going to have the .p12 file inside the resources folder and compile it and let it inside the same .jar
Do not try to run the application in a localhost environment because it just won't work unless you've got an SSL running locally, or unless you are compiling the code at the server the application is going to be running, what I just did was compiling the code on the terminal I worked with and after that, I just uploaded the final .jar to the remote server
"
now that the SpringBoot application is up and running the best way to test what we have done until now is testing the endpoint on a browser https://apitester.xyz:8443/get/hello
we can see now that our API is running with SSL!, another way to test it is
going to this address https://decoder.link/sslchecker let's set our domain name and port 8443
if everything was done perfect, you should get something like this
you can download the project for Tomcat from this link in GitHub https://github.com/juandavidmarin368/SpringBoot-with-Tomcat-HTTPS
NOTE: "
* If you are going to move your API to another server, you just copy the .p12 file and change your CNAME to the new server and it works as before.
* You can have multiple SpringBoot applications .jar at the same time using the same .p12 but having them on different ports on the same server, an example about it would be:
SpringBoot app one = https://apitester.xyz:8443/get/hello
SpringBoot app two = https://apitester.xyz:8454/users
"
Great post.
ReplyDeletehttps://linktr.ee/ProPlusLogicsSolutions
internet social networking can online information computer earn money blog technology
ReplyDeleteSSL certificate meaning